


TL;DR
Preference testing is a user research method that involves showing people two or more design variations to understand which they prefer and why. It enables UX and Product teams to evaluate user preference regarding visuals—like layouts, logos, copy, and UI components—early in the design process.
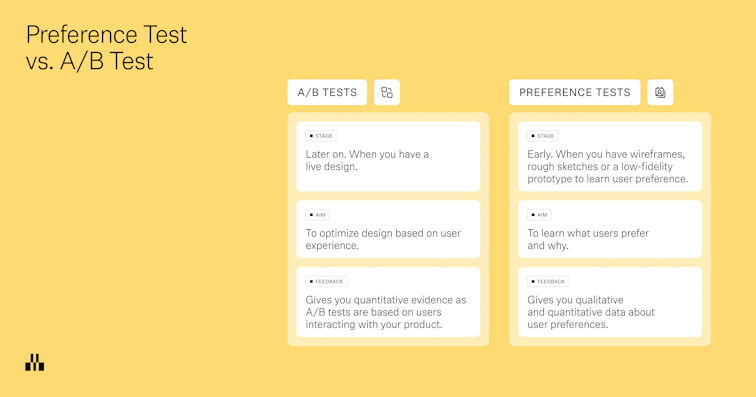
Unlike A/B testing, which typically runs on live traffic and measures behavior against KPIs like clicks or signups, preference tests focus on perception, trust, and first impressions.
With Maze, you can import designs, recruit participants, collect qualitative and quantitative feedback, and review automated reports in one place.
You might love a particular logo, layout, or color palette, but that doesn’t mean your audience will.
Preference testing helps bridge this gap. It shows multiple design options to real users and asks which they prefer. This way, teams can validate visual decisions early and avoid costly missteps later.
In this guide, we explain how preference testing works, how it differs from A/B testing, when to use it, and how to run a test with Maze.
What is preference testing?
Preference testing is a research method that helps user researchers compare two or more design options by asking participants which one they prefer. It’s often used to test visual elements like layouts, logos, images, or copy in the early stages of design.
Preference tests also dig into why users feel that way. This helps you identify perceptions around brand personality, trustworthiness, and visual clarity; insights that can guide meaningful design decisions.
Teams can run preference testing as a qualitative study (through interviews or open-ended responses) or as a quantitative study (surveys with structured questions, rating scales, and larger sample sizes) at scale. For the best results, use it when comparing simple, standalone screens or assets, not multi-step flows or complex interactions.
A/B testing vs. preference testing: what’s the difference?
A/B testing is a quantitative research method that measures user behavior by randomly distributing live traffic between two or more design variants. It compares their performance against predefined success metrics, such as conversion rate, task completion, click-through rate, or time on task. This determines which version produces statistically significant improvements in user actions and business outcomes. It’s typically used post-launch to test what drives more conversions, clicks, signups, or other performance KPIs.
Preference testing, on the other hand, happens in the early stages of the design and development process. It’s used to compare static visuals like mockups, wireframes, or brand assets—asking users which version they prefer and why. Rather than focusing on outcomes, it uncovers user perception, visual appeal, and emotional response. It’s a fast way to gather directional feedback before a design is finalized or developed.
In short: A/B testing shows you which version performs better in the real world. Preference testing shows you which version users like better and why.

Preference test examples
Not sure when to use preference testing? Here are a few common scenarios where it can help shape early design decisions:
- Homepage layouts: You’ve mocked up three wireframes for your homepage. A preference test helps you understand which version feels most aligned with your brand or product vision, before you commit to usability testing or prototyping.
- Logo designs: When choosing between logo options, preference testing can reveal which design users find more trustworthy, recognizable, or emotionally appealing, in a critical context, before it’s rolled out in live campaigns.
- Marketing visuals: Running a product experiment or paid campaign? Use a preference test to gauge which hero image or ad creative resonates most—before committing to full-scale variant testing in a live environment.
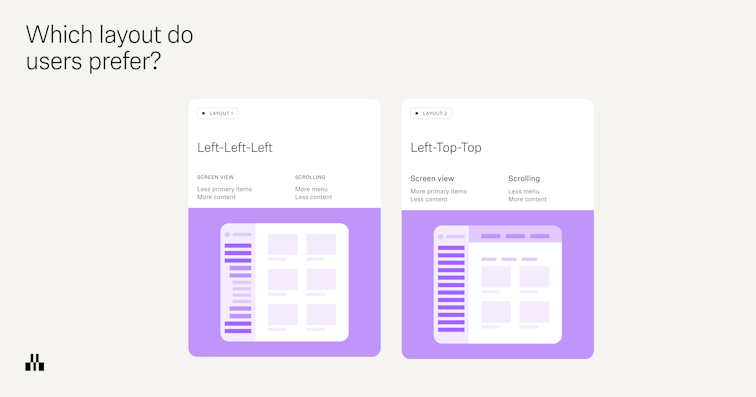
- UI components: You’ve created two versions of a settings screen, one with tabs, one with a sidebar. Preference testing tells you which layout users find more intuitive, giving you a head start before testing with interactive prototypes.

Why are preference tests important?
Preference tests give you an understanding of your users’ preferences, likes, and dislikes, and help you understand how your users feel about different design elements. They allow you to pick your users’ brains early on in the design phase, before you’ve invested too much time and energy into a design that may not appeal to your users.
Unlike concept validation or usability testing, which evaluate functionality and feasibility, preference tests focus specifically on aesthetics and subjective appeal. The insights can guide multiple stages of the design process—from broad decisions like color schemes and layout structures to specific tweaks in typography, icons, and imagery.
How to conduct preference tests
Whether you’re validating visual direction or fine-tuning UI details, a well-run preference test can reveal patterns, highlight blind spots, and shape sharper design decisions. Here's how to do it right.
Step 1: Identify objectives and metrics
Do you plan to understand which design variations users prefer? Or, do you want to learn how they perceive each design in terms of brand, clarity, or trust? Taking the time to lock in these goals and upfront ensures your test stays focused and your results are actionable.
At this stage, it's also helpful to define how you’ll measure success. Are you tracking preference percentage, emotional sentiment, or alignment with brand values?
Locking in your goals and metrics early gives your test direction and makes it easier to analyze the user feedback later.
Step 2: Prepare design variants
Once your objective is locked in, get your design variations ready for testing.
These can be static mockups or lightweight prototypes: for example, screens designed in Figma, or AI-generated prototypes using tools like Figma Make, Bolt, or Loveable. Keep changes focused on a small number of variables, such as layout, imagery, or copy, so you can interpret the results clearly.
Aim for two or three variants with the same level of fidelity and similar context. If one version is a polished prototype and another is a rough sketch, your test participants will react to quality rather than the actual design choices.
Try to keep the test variants between two or three because when it gets more than these, it becomes difficult for people to make a comparison.
Mitchelle Chibundu
Lead Product Designer @ Flutterwave
Share
Step 3: Recruit participants
As is the user testing rule of thumb, you need to find test participants that reflect your target customers as closely as possible, as well as the frame of mind or context needed to understand the design.
That usually means people who either already use your product and understand the context, or people who fit your ideal customer profile and can offer ‘fresh eyes’ on a new product or redesign. The closer the fit, the more reliable your user feedback.
And if you’re using a research platform like Maze, you can access Maze panel, a global pool with millions of participants, who match specific demographics or behaviors. You can share your study link through your usual channels, send Reach email campaigns to your participant database, or trigger in-product prompts to catch people in the right context.
If you are running multiple tests and want a randomized audience across them, you can also use custom URL tools like Linkly or Nimble Links, or email A/B features, to split people evenly between study links.

Wondering how many users you need for a preference test? We suggest you test with at least 20 users to uncover most issues in your design. If you need statistical significance or you are testing several design variations, increase your sample to strengthen your test results.
Step 4: Conduct the preference test and gather data
With your objectives, design variants, and target audience ready, you can run the test.
Start by giving participants just enough context to understand the scenario you are testing. For example, “Imagine you have just landed on this pricing page while comparing tools for your team.” Then show your design variations in a consistent way, either one at a time or side by side.
Ensure that you alternate which design is shown first. This reduces bias as it takes care of the recency effect where the last shown design is more likely to be favored.
Jolene Tan-Davidovic
Senior User Researcher @N26
Next, ask clear research questions. Combine a direct preference question with a small set of follow-up questions so you collect both quantitative data and qualitative feedback. For example:
- Which version do you prefer? (single choice)
- Why did you choose this option? (open question)
- Which version feels more trustworthy? (opinion scale)
- Which option makes it easier to understand what this page is about? (multiple choice)
This mix lets you quantify test results while still capturing nuance around user behavior, trust, and desirability.
If you are using Maze, you can also enable AI-generated follow-up questions for your open-ended questions. Maze AI uses the participant’s initial answer to ask up to three tailored follow-up questions and then helps you analyze sentiment and themes, which turns short responses into richer qualitative data.

Step 5: Analyze test results
Start by looking at the top-line test results: what percentage of participants preferred each design variation, and how did they rate each option on trust, clarity, or visual appeal?
If your sample size is large enough, use these numbers as directional evidence for which variant is performing better and where there might be gaps in the user experience.
Next, dig into the qualitative feedback. Group open-ended answers into recurring themes based on what users mention. For example, you might notice multiple participants commenting on readability issues, visual clutter, or describing one design as “more modern” or “more trustworthy.” Look for these patterns and turn them into actionable insights: what should change, what should stay, and what needs another round of iterations or additional user testing (like usability testing or card sorting).
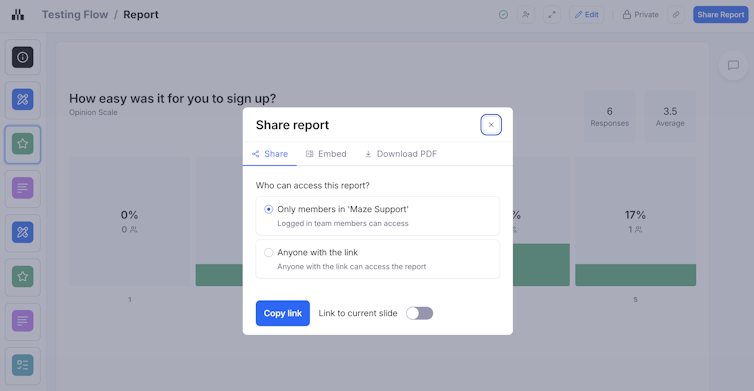
Maze automatically generates a report for every live study, pulling key metrics, charts for closed questions, and sentiment and quotes for open questions into one place. You can filter results, customize the report to highlight the most important findings, and share or embed it with stakeholders. This means everyone can see which variant performed best, why users preferred it, and what you’ll optimize next.


Limitations of preference testing
While preference testing is valuable for gathering subjective feedback, it has limitations. Since participants evaluate static designs without actually using them, preference testing can't capture how designs perform in real-world scenarios.
This leads to several key concerns:
- It does not measure real behavior or task success: People tell you what they like, not whether they can complete a task or find what they need. Pair preference tests with usability testing or prototype testing later in the design process to validate whether the ‘winning’ option supports key tasks.
- It is based on static designs, not real interaction: Participants react to screenshots or simple prototypes, which do not fully reflect the complete design. Use preference testing early to choose a direction, then move into interactive prototype tests or live A/B testing to see how designs perform in context.
- Results can be superficial or popularity-driven: People often choose what looks cleaner or more modern, even if it is not the clearest or most functional. Always add follow-up questions to capture the ‘why’, and weigh visual preference against other data such as task completion, time on task, or error rates.
Preference testing best practices
Preference testing works best when it’s structured, deliberate, and lightweight. Use these practices to keep your studies focused.
- Start with a focused question: Define a clear research objective (for example, “Which layout feels more trustworthy for pricing?”) so your variants, audience, and questions all ladder back to that goal.
- Change one thing at a time (or as close as possible): Keep structure and content consistent and only vary what you’re actually testing, like color, hierarchy, or imagery. If everything changes, you won’t know what drove the result.
- Give realistic context before you show designs: Brief participants on the scenario they’re in (for example, “You’re comparing tools for your team…”) so their choices are grounded in a real use case.
- Ask one clear preference question and a few smart follow-ups: Use a primary preference question, then 2–3 targeted follow-ups around trust, clarity, or first impression so you get depth without fatigue.
- Use a mix of structured and open responses: Combine scaled or multiple-choice questions (to compare patterns quickly) with at least one open-ended question (to capture language, nuance, and unexpected insights).
- Randomize order to reduce bias: Don’t always show the same variant first. Users often favor the first option they see (called the primacy effect), so randomizing the order of designs helps prevent one variant from getting an unfair advantage just because it appears first.
- Use your tooling to keep tests consistent: In a platform like Maze, use consistent blocks (for example, opinion scales, multiple choice, open questions with AI follow-ups, variant comparison) so every preference test follows a similar structure and is easier to compare over time.
Run preference testing with Maze
Preference testing is most useful when it slots neatly into your existing design and research workflow. Maze is built for exactly that.
With Maze, you can set up a preference test as part of a broader study or as a focused, one-off comparison. Import designs directly from tools like Figma or AI-prototyping tools like Figma Make, Bolt, and Loveable. Then use ‘Variant Comparison’, ‘Multiple Choice,’ ‘Opinion Scale,’ and ‘Open Question’ blocks to structure a clean, repeatable flow for your test.
Plus, Maze automatically generates a live report for every study, so you can see which variant users preferred, how they rated trust, clarity, or appeal, and what themes are emerging in their written feedback. You can customize these reports, filter by segments, and share or embed them in the tools your stakeholders already use.
With Maze, you make preference testing a part of how your team validates visual decisions.
Frequently asked questions about preference testing
What is preference testing?
What is preference testing?
Preference testing is a research method that involves participants choosing between 2-3 design variations and explaining their preference. Preference testing is used to understand users’ brand perception and visual preferences.
What is the goal of preference testing?
What is the goal of preference testing?
The goal of preference testing is to understand how users perceive different potential designs and what they feel about them.
What is the difference between preference testing and A/B testing?
What is the difference between preference testing and A/B testing?
Preference testing compares static design options by asking users which one they prefer and why, focusing on perception, visual appeal, and trust. A/B testing runs different versions in a live environment with real traffic and measures which one performs better against concrete metrics like clicks, signups, or conversions.
What is a good sample size for preference testing?
What is a good sample size for preference testing?
A good starting sample size for preference testing is at least 20 participants. That’s usually enough to spot clear patterns and catch most major issues. If you’re testing several design variations, or you need more statistically reliable results, aim for a larger sample (30+).
Can preference testing be done remotely?
Can preference testing be done remotely?
Yes, preference testing is well-suited to being done remotely. You can share designs as images or prototypes, send a study link to participants, and collect their preferences and answers asynchronously. With a platform like Maze, you can recruit participants, run preference tests, and analyze results entirely online.
How do I perform preference testing with Maze?
How do I perform preference testing with Maze?
To run preference testing with Maze, you must create a study, import 2–3 design variants (for example, from Figma or AI-prototyping tools like Figma Make, Bolt, or Loveable), and add a core preference question plus a few follow-ups. Then, you share the study link with your own audience or recruit from Maze Panel and collect responses. Review the automatically generated report to see which variant users preferred, why they chose it, and how that should inform your next design iteration.


