Have you ever heard the tale of the sinking library? The basics are this: an architect built a beautiful library, but after a few years, the building started sinking. Upon reviewing their work, the architect realized the issue: they forgot to account for the weight of the books.
Whether you're building a library or a website, most projects have a lot of moving parts. With a lot to keep track of, you might miss something critical. So how can you avoid those mistakes? How can you make sure you don't forget the "books"? For a design project to be successful, the design brief is essential.
In this article, we look at what a design brief is, why you should use one for your design projects, and share a nine-step plan to create an effective brief that helps you keep everything on track and achieve your goals.
What's a design brief, and why do you need one?
A design brief is a project management document outlining the specifics of a design project. There's no standard of what to include, but some common points are the design project overview and scope, timelines, target audience information, and budget.
There are plenty of reasons to use a design brief, but there are two that we think are most important: efficiency and direction. Whether you’re a professional delivering a new design to your client or a business looking to hire a design agency, a well-written design brief is imperative to doing great work. Showing your client an overview plan of the project means you can confirm everything before the work starts. This saves time and money for both of you.
A design brief serves as the source of truth for your project and guides the design team's overall direction. Having a well-defined brief helps designers focus on the right tasks and deliver great work.
Who should write a design brief?
If a company decides to partner with a design agency on a new design project, they need to write a design brief. Design briefs are the starting point of any design project and should provide an overview of the company, the problem to be solved, and the expectations.
Although the client creates the design brief, design agencies or freelancers usually participate in its creation. For example, clients might have a general idea of the project and know what problem they’re trying to solve, but they may not be familiar with the design process. In this case, designers work closely with the clients to help finalize the design brief and set the right goals and expectations.
What should be included in a design brief?
For a design brief to be effective, it needs to be clear and concise while including all the relevant information to give a good overview of the project. A brief can vary depending on your specific project, but in general, it should include:
- An overview of the business: This section gives designers an understanding of the client—their company, industry, market, and design needs
- Project overview and scope: In this section, you can see what work the design team will do for their client
- Information about the target audience: Relevant information might include age, gender, habits, preferences, needs, and more
- Competitor information: Noting down what competitors are doing will give you insights into your customer’s expectations and help you identify what makes you unique
- The goals of the project: This section focuses on the problem to be solved and the desired outcomes
- A project timeline or schedule: Having a schedule will help you set the right expectations and keep the project on track
- The project budget: This section should include the estimated budget for each task in the project
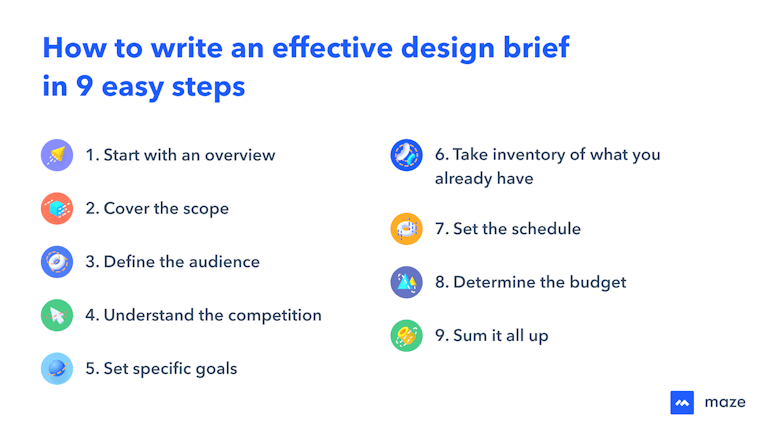
Now that we’ve seen how an effective design brief should look, here's how to create one in nine easy steps.
How to write a design brief

1. Start with an overview of the business
When preparing your design brief, start things off by laying out key information about the business. In the overview, you can include basic details, like the size and stage of the company, the industry they’re in, etc.
From there, you might talk about the brand’s identity and values, key differentiators, and unique selling points. If there is a “point-person” at the company, include their contact information in this section or the contact details for someone else part of the project. The overview is a key section for everyone involved in the project as it provides the required info at a glance.
2. Cover the scope
Now that the brief includes an overview of the business, you should lay out exactly what work is needed, also known as the project scope. Maybe the project is about creating a new logo for the company, doing graphic design work for a landing page, or web design for an existing product.
Both parties should agree on the scope of the project, and describe that scope in the design brief.
Be sure to be as specific as possible in this section. For example, if the project involves creating illustrations or photographs for a campaign, describe this in the design brief. If it only requires web content but not print, be sure to include those types of details so everyone is on the same page and there’s no uncertainty or wasted effort.
3. Define the audience
Frank Chimero, a designer and writer in NYC, once mentioned: "People ignore design that ignores people." Who you're designing for is just as important as what you're designing. To define the target audience, start with basic demographic information like age and gender.
From there, consider including relevant details about the audience, such as the types of stores they shops at or movies they like. You may also want to describe their familiarity with similar tools or products, or where they are most likely to interact with your content.
In some cases, someone in the company might already have drafted personas for their target audience. If not, consider building a persona for the target audience using existing customer information. To build a persona, follow these seven questions:
- Who is the customer(s) of your product or service?
- How do they use your product?
- What are they currently using (if it's a new product)?
- What are some key pain points your product or service solves?
- How does your solution benefit them?
- What causes them to make a purchase?
- What are they looking for in a product like yours?
Understanding the audience helps guide your decision-making and create useful products for the right audience.
4. Understand the competition
In almost every scenario of building products, you will be competing against another company. It's a fact of business. So it's good to have a basic understanding of the competitive landscape. When you understand what makes you different, you can create new, unique work and stand out from the competition.
That knowledge can help design teams decide on the angle of the design project and deliver something that truly resembles the company’s brand identity. In this phase, mood boards are an excellent way for designers to collect inspiration, organize ideas, and present them to the client.
Additionally, when working on digital design projects, knowing how similar products approach design may help designers understand how users complete tasks and their mental models when using comparable designed products. Conducting usability testing with competitive products is a great way to do some preliminary research and gather useful background information.
5. Set specific goals
Good design solves problems. When a company hires a design agency for a project, they’re doing it to solve an existing problem. Maybe they want to get more leads or provide a new product offering to their customers. No matter the case, there’s a specific reason for hiring professional designers, and that needs to be described in the design brief.
Determining the goals and objectives of your design project helps with direction and focus. For example, if the company needs website design services for a landing page that encourages sign-ups, the focus could be on optimizing and testing button placement and color to get a higher click-through-rate.
These goals are usually articulated by the designers with the help of the business and have usually already been investigated with user research and data. If research is part of the project, then the project’s goals should reflect that. For instance, if your design project is building a better user flow for a mobile app, then one of the goals would be to research the existing flow and investigate common issues.
Do your best to be as specific as possible when defining the project goals and objectives. The success of the project will be assessed based on whether the goals have been met or not, so the more specific you can be, the better.
6. Take inventory of what you already have
In most cases, brands will have some assets that designers will use in the project–unless they’re doing a complete rebrand. Maybe they already have a logo design they want to use or a specific page layout implemented in a previous design.
At the very least, they will probably have a typeface, brand colors, and general brand guidelines. They may also have a design system in place designers can use to inform their work.
These items have a direct impact on the design project, so make sure you take inventory of all relevant information and include it in the creative brief.
Existing creative assets can help improve efficiency by making sure you don’t redesign something you don’t need to. Be as specific as you can on how you’re going to use current assets in your work. For example, if you’re reusing brand colors, write down the hex code for those colors you’ll use in the new project.
7. Set the schedule
Setting proper expectations is crucial when taking on any new project. Depending on who you’re working with, they may not be as familiar with the design process. By laying out a detailed timeline and giving deadlines for all deliverables, you will manage expectations from the beginning and deliver your project successfully.
Having specific dates also serves as a way to keep you on track. Consider asking for feedback from all stakeholders involved in the project prior to finalizing the timelines, so everyone is comfortable with your proposal.
List out the timeframes for each part of the project. For example, if you’re working on a new design, you might give a timeline for when the initial prototype will be done, schedules for user testing, and another date for the final product launch.
8. Determine the budget
The budget is an essential aspect of any project. Both parties must agree on the budget from the start, as the budget dictates the work that will be done. In the brief, it’s important to give a breakdown of the budget for each service provided.
It might also be wise to add in some contingency cushion as additional money for unforeseen issues. You can list it that way in the budget, and explain that it's there if needed. If you don't use that by the end of the project, you can subtract it from the total.
9. Sum it all up
Finally, make sure you end the design brief with an executive summary. It may seem a bit redundant, but it's good to have an outline that includes all essential information mentioned throughout the brief. Offering a cliff-notes version at the end allows the client to review and sign-off on the project easily.
Start using a design brief for your projects
When you've finished working on the design brief and got stakeholders' approval, it's time to start working on the design project. When you create a design brief, you compile all the essential information the design team will need during the project. Any work done during the project, such as creating a design proposal, is made easy by the design brief.
Creating a design brief is no small task, but it's worth it when done right. Not only does it help avoid roadblocks and sets proper expectations, but it can also serve as a source of truth for you to keep everything on track and moving forward—which is what you're aiming for.


